If you’ve already ruled out the flapper and your toilet is still running, especially if you hear water trickling into the overflow tube no matter how long you wait, the fill valve is almost certainly the problem. It’s a slightly bigger job than a flapper swap, but still very much a DIY-friendly fix that only costs $10-25.
The fill valve is the taller mechanism inside your tank, usually positioned on the left side. Its job is to let fresh water into the tank after every flush and then shut off completely once the water reaches the right level. Most modern fill valves use a float, either a cup that rides up the shaft or a ball on an arm, to sense water level and trigger the shutoff.
Fill valves typically last 5-7 years. When one fails, it typically can’t seal shut all the way, so a slow (or not-so-slow) stream of water keeps flowing into the overflow tube and straight down the drain, 24 hours a day. That’s the hissing or trickling sound you hear even when nobody’s touched the toilet in hours.
Inside the valve, the shutoff mechanism relies on a rubber or silicone seal pressing against a small opening. Over years of hard water exposure, that seal picks up mineral scale, and eventually it can’t close all the way no matter how well the float is positioned. That’s why fill valves, unlike flappers, often can’t be fixed by cleaning alone once they reach this point.
Take the tank lid off and watch the water for about 60 seconds without touching anything:
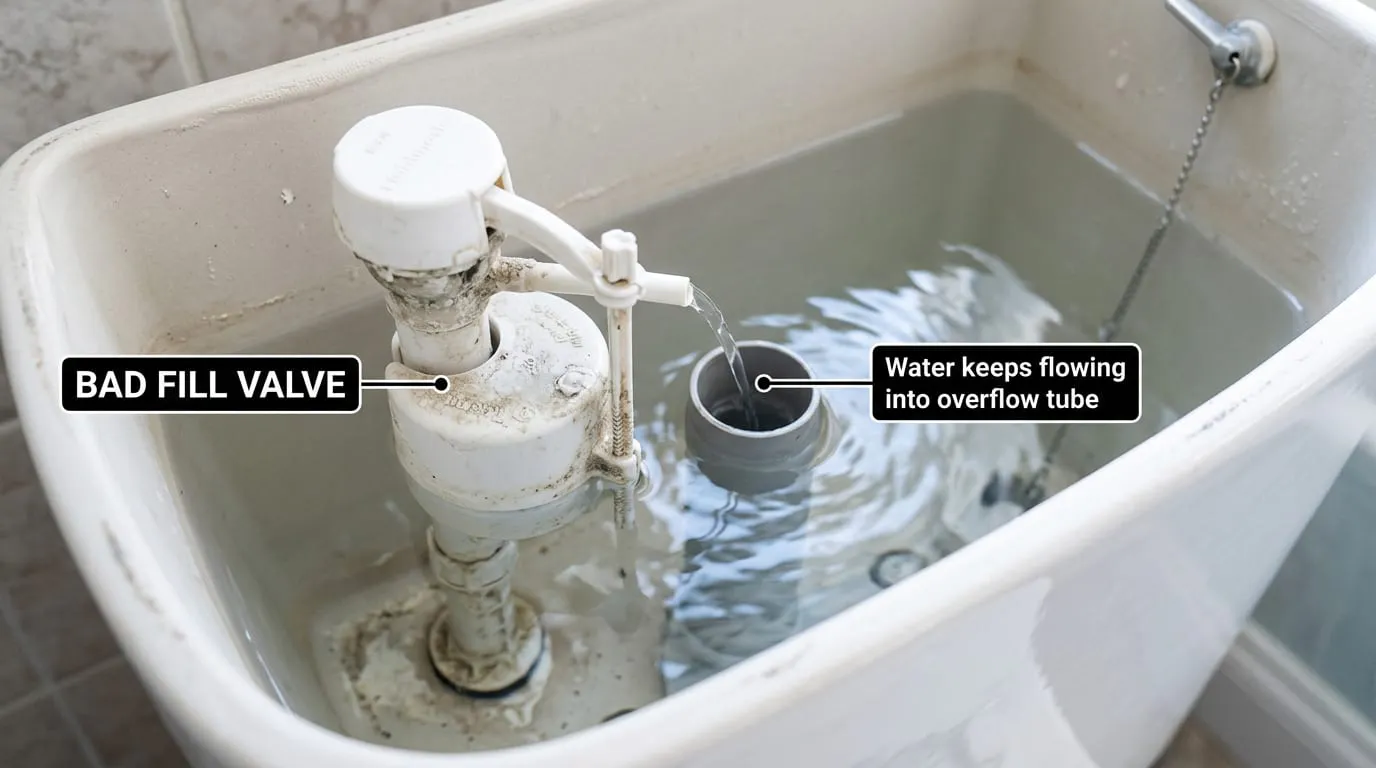
Still not sure what you’re looking at? Snap a photo of your open tank, HomeFlash’s AI can confirm what you’re looking at and tell you whether it’s pointing to the fill valve, the flapper, or something else, in about 60 seconds, free.
If the symptom is a weak or slow refill rather than a valve that won’t shut off, it’s worth trying a cleaning before buying a new part. Shut off the water, remove the valve’s cap (most modern valves have a small twist-off cap on top), and rinse the internal seal and screen under running water to clear sediment. This takes about 5 minutes and costs nothing. If the valve still won’t shut off completely after cleaning, or if it’s the shutoff itself that’s failing rather than the flow rate, replacement is the more reliable fix. A worn shutoff seal rarely improves with cleaning alone.
Fill valves are height-adjustable on almost all modern models, so you generally don’t need to match your exact toilet brand. Just confirm the tank has enough clearance for a standard valve height. A couple of brand notes are still worth flagging: Kohler and American Standard one-piece toilets sometimes have shorter tanks with less vertical clearance, so double-check the box specifications list a minimum tank height that fits yours before you buy. Fluidmaster’s 400A and PerforMAX lines are among the most widely stocked universal options and fit the vast majority of two-piece residential toilets without modification.
Step 1: Shut off the water supply. Turn the shutoff valve behind the toilet clockwise until snug. Flush to drain most of the tank, then hold the handle to clear out as much water as you can. If the shutoff valve won’t turn or feels seized, don’t force it. Shut off your home’s main water supply instead and consider having the shutoff valve itself replaced while everything is already drained.
Step 2: Disconnect the water supply line. Using your wrench or pliers, loosen the coupling nut connecting the supply line to the bottom of the fill valve, underneath the tank. Have a towel and bucket ready. A small amount of water will drip out. If the connection is old and corroded, apply steady, even pressure rather than jerking on the wrench; a sudden twist can crack a brittle fitting.
Step 3: Remove the old fill valve. Unscrew the locknut holding the fill valve to the base of the tank (you can usually do this by hand or with pliers). Lift the old valve straight out. Take a look at the rubber washer or gasket that sits between the valve base and the tank. If it’s cracked, hardened, or misshapen, that alone may explain part of the leak, and it should be swapped along with the valve.
Step 4: Set the height on the new valve. Most universal fill valves adjust by twisting or sliding the body up or down. Set it so the top of the valve sits at least 1 inch above the overflow tube once installed. Check the packaging for your specific model’s instructions. Getting this height wrong is one of the most common installation mistakes: too low, and the valve risks siphoning dirty tank water back into your home’s clean water supply during a pressure drop, which is exactly why plumbing codes require that 1-inch air gap.
Step 5: Install the new valve. Place it into the opening at the bottom of the tank, hand-tighten the locknut underneath, then snug it a bit more with pliers. Don’t overtighten, or you risk cracking the tank. Porcelain doesn’t flex, so “snug plus a quarter turn” is usually enough; if you’re leaning on the pliers with real force, back off.
Step 6: Reconnect the water supply line and refill line. Attach the supply line coupling back onto the base of the valve. Connect the small refill tube from the top of the valve to the overflow tube (this refills the bowl after a flush). Most kits include a clip to hold it in place near the top of the overflow tube, above the water line. A misplaced refill tube is a sneaky cause of a weak-refilling bowl even when the main valve works fine.
Step 7: Turn the water back on and test. Open the shutoff valve slowly, let the tank fill, and watch where the water settles. Adjust the float (twist the float clip or bend the arm, depending on your model) so the water level stops about an inch below the top of the overflow tube. Flush once to confirm it shuts off cleanly. Do a second flush a few minutes later. Sometimes a valve seats fully only after the first full fill-and-shutoff cycle, so it’s worth testing twice before you consider the job done.
Getting the float adjustment right matters more than people expect. It affects both whether the toilet runs and how well it flushes. Too low, and the tank won’t hold enough water for a strong, complete flush. Too high, and the excess spills into the overflow tube and drains continuously, which looks and sounds exactly like a running toilet even though the valve itself is working correctly. The sweet spot, marked on most tanks as a fill line or molded ridge, sits about an inch below the top of the overflow tube. If your tank doesn’t have a marked line, that one-inch rule of thumb is a safe default for nearly all standard toilets.
Fill valve replacement is beginner-friendly, but there are a couple of situations where it’s worth pausing: if your shutoff valve is corroded and won’t turn, if you see cracks in the tank itself, or if water is leaking from a spot other than the connections you just made. Forcing a stuck shutoff valve is one of the more common ways a simple repair turns into a nightmare. It’s also worth calling a pro if your home still has galvanized supply piping throughout, since any disturbance to old galvanized fittings can sometimes reveal corrosion that’s better handled by someone equipped for a full fitting replacement.
If you’ve already tackled the flapper and it didn’t solve things, or you want the full rundown on how a toilet can run and why, check our complete guide to fixing a running toilet. And if your symptoms don’t match this guide, our post on why your toilet keeps running covers all seven causes worth ruling out.
I know all this information at once can feel like drinking from a firehose. Broken parts, buying the correct replacements, installing the new one correctly, and everything in between can be stressful. It’s a lot to digest, especially if you’ve never done it before. That’s why we made HomeFlash, ease your mind. We’re on your side. This technology was specially curated for the modern homeowner.
Written by Will, Founder of HomeFlash.
More plain-English repair guides from the HomeFlash library.

Why Does My Toilet Keep Running? (7 Causes)
Toilet keeps running and you don’t know why? Here are the 7 most common causes, how to tell them apart, and how to fix each one.
Sep 30, 2026
Learn more
How to Replace a Toilet Flapper (Step by Step)
Toilet flapper replacement takes 15 minutes and costs $5-15. Follow this simple step-by-step guide before you call a plumber.
Aug 13, 2026
Learn more
Breaker Keeps Tripping With Nothing Plugged In: What’s Happening
A breaker that trips with nothing plugged into the circuit isn’t an overload. Learn the real causes, including a full breakdown of arc fault (AFCI) tripping, and when to call an electrician.
Sep 30, 2026
Learn more
How to Unclog a Toilet Without a Plunger
No plunger? No problem. Here are 5 proven ways to unclog a toilet using stuff you already have at home, step by step.
Sep 30, 2026
Learn more